The first 10-15 minutes of my math block is always reserved for some sort of review or spiral activity. This year, from September to December we dove into Number Talks, from January to March Break we did Math Meetings (4th Grade Frolics has a great post about it HERE), and from now until the end of the year we'll be switching between Math Meetings on Tuesdays and Thursdays, and My Favorite No on Mondays, Wednesdays, and Fridays. Perfection.
If My Favorite No is new to you, you have to start out by watching THIS VIDEO (then come right back here so I can share more with you). ;)
My Favorite No is the perfect companion to all the Growth Mindset teaching I've been doing in the classroom this year - teaching that the best learning opportunities come from making mistakes. This is EXACTLY the message I want my students to take away from all of this.
OK ... so here's how it goes. I pose a problem. In the past I've done more skill (knowledge) based questions, but this year I'm focusing on word problems because my data is showing my students need this. I write the problem on a small cue card and project it for the students to see.
We then go through and mark the question together using CUBES. (You can read more about CUBES in a blog post I have HERE).
Then, my students get 5 minutes to independently solve the problem (I set a timer and everything because they love the timer). They are also writing on the small cue cards (I'll post a link to the cue cards I bought at the bottom of the page. I buy them in bulk, but any method you choose will work fine).
When they are finished, before they hand their cards in, they have to do a traffic light comprehension dot in the corner (green for no problems, yellow for a little difficulty, and red for a lot of difficulty). I have a poster hanging in my class explaining the Traffic Light Comprehension Dots (I had it made at Vistaprint) - but you can grab a free copy of the pdf I made HERE. We use traffic light comprehension dots on everything!
 The students also color code their answers according to our Math Response Learning Goals. These learning goals are EVERYTHING in my classroom. They are seriously one of my most favorite resources. They are from my Building Better Math Responses resource and they have truly made our responses better. You can take a peek at them HERE.
Students don't write their names on the front of the card before they hand it in, instead, I just have them initial the back - that way, if their card is chosen as "My Favorite No" it still has a little anonymity to it. When they hand the cards in, I quickly sort them into 3 piles - 1) correct, 2) correct strategy but a small error somewhere, and 3) incorrect.
 I then sort through the "correct strategy but a small error somewhere" pile and choose "My Favorite No". This particular card will have a lot of wonderful thinking shown, but contains a small error or misconception somewhere that probably more than a few students in the class are making. I put this card up under the projector for all to see (remember, it's anonymous) and talk about all the wonderful things I love about the answer given. I then give students one to two minutes to do some error analysis with their partner or elbow buddy. After this time, together we fix up the problem and (hopefully) clear up any misconceptions.
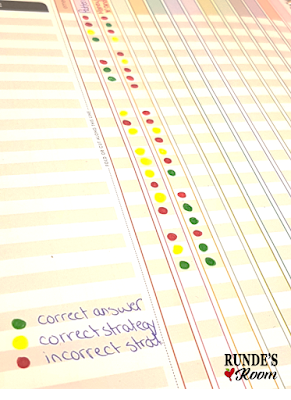 So ... what do I do with the cards when we're done? Well, remember the three piles I sort the cards into? I record this data into my grade book with easy colored dots - green for correct, yellow for correct strategy but small error, and red for incorrect. I write the math concept for the word problem at the top of the page so I can go back and see where we need to do a little extra review. These circles will also make it very easy to see which students need a little extra help with some small group sessions during math stations. We've done two of these activities this week, so this is what my grade book looks like so far. (See all those yellows and reds ... we've got some work to do during this last term ... but we're up for it).
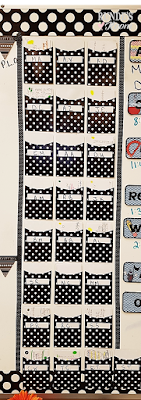 I put a little sticker in the corner of the correct cards, and then I file all the cards in little library card pockets for each student. When the pockets get too full, we simply clip the cards together and file them in our portfolios, and start filling them again. The students crowd around me as I'm putting the cards in the pockets to see if they got a sticker on their work - it's kind of fun. :)
Now, if you're thinking this will embarrass the students, it won't. I promise. In all the time I've done this in my class, I've never ever ever had a student upset by it. There is a solid rule in my room that we don't say whose card is My Favorite No, and their names aren't on the cards. But ... even so, often the student who was chosen is really excited they had the chosen card, and will want people to know (even though I still don't let them say anything in the classroom). When you teach your students how important mistakes are to the learning process, they are not embarrassed by their mistakes, they look forward to growing from them. And that, my friends, is a beautiful thing.
(affiliate link)


