Nothing Says Birthday Like Dr. Seuss

29 February 2012
With Dr. Seuss's birthday coming up on Friday, I wanted to share a few pictures with you.  Two years ago my middle daughter had a Dr. Seuss party for her 4th birthday.  It was a blast!!!  Dr. Seuss is a favourite around here - all 3 of my girls learned their letters from Dr. Seuss's ABC's, Hop On Pop was one of the first books they could recite by heart, and The Cat in the Hat was always a winner (still is).  I LOVED the books when I was a child, LOVED the memories I have reading them to my own children, and I know I'll LOVE to share them with my grandchildren one day.
This was the cake I made - looked great the night before, but was drooping in a VERY Cat in the Hat way by the party.

Made Thing 1 and Thing 2 cupcakes - cotton candy on top of a cupcake ... what's not to like?


Party favours - complete with a Seuss-like poem.


The sweet table (you can see the cake leaning dangerously now)

We played Seuss games (the kids LOVED this one).

Nobody loves a party more than my little Katie!  This was one to remember!


On another note ... it was quite an up and down day!  Testing workshop in the morning, drove home through a blizzard after school (but we're going skiing tomorrow, so all this snow will be nice), and was greeted by a flood of emails from TeacherspayTeachers when I got home.  Thank-you so much to anyone who purchased something today.  The sale continues through midnight tonight if you haven't had a chance to check it out yet (I cleaned out my wishlist after school today - got some FANTASTIC resources!).  All my resources are on sale for 20% off, and use the promo code on the right for an additional 10% off at the checkout.

Happy Wednesday!  


11

Leap Into Savings

27 February 2012
Perhaps you may have heard by now - TeachersPayTeachers is having a HUGE Leap Day sale on Wednesday, February 29th!!!  All my products will be on sale for 20% off.  Then, use the promotion code L2P9Y to get an additional 10% off at the checkout.  Just click on the image on the right to start building your wishlist.  Now that's something to LEAP about!

Happy Monday!
0

Catching Cooties, Birds, and Pins

26 February 2012
Are you intrigued by my title?  I've got a few odds and ends to blog about tonight (my rule-breaking 2nd post of the day), and it's the most interesting title I could think of (I tried to be original and get a goat into the title, Kim, but I just couldn't figure out a way to get it in).  ;)

So, catching "pins" is all about Pinterest.  Have you read Laura Candler's post, "Do You Have Permission to Pin?".  If you're as addicted to Pinterest as I am, it's a MUST READ.  As you can see by the button on my sidebar, you have permission to pin images from my blog.  Please be sure you are pinning from the exact blog post (click on the title of the post) so that your pin links to the correct post (can't tell you how much time I've spent searching through blogs for ideas I've found pinned). You can check out my boards and pins by following me on Pinterest.
Follow Me on Pinterest

Moving on ... catching birds was part of our family fun yesterday.  It was a beautiful sunny day, and my youngest decided she wanted to make some bird feeders.  It sounded like a great plan so we got right on it.  I wanted to use bagels, but we didn't have any, so I found some old CDs and we used those instead (birds like shiny things, right?).  We slathered the CDs in peanut butter and then pressed them into birdseed.  Add a colourful ribbon, and you're all set.  Not long after we hung them we had a few little chickadees checking them out.  So much fun for the girls (and me).

Lastly, I've been catching some more cooties ... ummmm ... not the kind in the hair ;).  I need some fun activities for my early finishers as we're completing the last stages of publishing our book.  I want to keep the students engaged in learning, but in an entertaining way - I don't want them to feel punished for finishing early.  I've decided to set up a few stations around the room with various sets of my cootie catchers.  I just finished my Punctuation Cootie Catchers today and uploaded them to my TPT store.  Click on the picture to take a peek.
And, like my others, if you are one of the first 5 to leave a comment on this post with your email address, I'd LOVE to send you a copy just for being the fabulous followers you are!

Happy Sunday!!!

21

Math Journal Sundays

Ahhhhh ... Sunday morning.  All is good.

I've got a quick little foldable to share with you today from our math journals.  We're just finishing up our Measurement unit (we've covered measuring length, metric conversions and perimeter and area of rectangles, triangles and parallelograms).  Our test is on Monday, so we spent Thursday and Friday in review.

We made a 4-corner foldable to review the formulas for the area and perimeter of the different shapes we learned.  (It was actually quite funny because as I started folding the paper under the Elmo, the kids got excited and asked if we were doing another cootie catcher ... they know me so well).  Anyhow, it wasn't a cootie catcher (this time), but it was good for review.  On the inside of each flap we found the area and perimeter of each shape (the students had to measure the dimensions of the shape they drew on the outside of each flap).
photo of area and perimeter math journal entry @ Runde's Room

photo of area and perimeter math journal entry @ Runde's Room

That's about it ... I'm planning on breaking the "no more than one post per day" rule today, but I've got to get a few things (ok - more than a few things) done first ... stay tuned ...

Happy Sunday!!!


13

Friday Art Feature - A Few Odds and Ends

24 February 2012

It's been a bit since I've posted a Friday Art Feature.  I have a good reason for this, though.  We actually have a few different art projects going on right now.  My students are working through different assignments, and as they finish, I get them started on another one.  There is never a wasted moment in my class ;)

Everybody finished our two-point perspective art we were working on.  I posted about it in my last Friday Art Feature.  Anyhow, I got my bulletin board up with the first 12 pieces in.  Looks pretty good!


We're also working on our illustrations for the book we're working on.  We're writing our own Chronicles of Harris Burdick.  Can't wait to share the finished product with you - it's going to be FANTASTIC!!!  Here are a couple of the finished illustrations ... see, I told you - it's going to be FANTASTIC!


Lastly, my students who have already finished their story and illustration got to get started on our latest art project.  We only just started yesterday, but I hope to share these with your next week.  Here's a sneak peek ... (if you follow me on pinterest you may already have an idea of what we're doing ...)

Happy Friday!  It was supposed to be a short week with the holiday on Monday, but if you ask me, it was a LLLOOONNNGGG one ... TGIF!


10

Writing Historical Letters

22 February 2012
My students' historical letters were due today, and I couldn't have been happier with them (the letters or the students).  They had to write a historical letter from the point of view of one of the European Explorers we had studied in class.  I wrote the success criteria in the format of a friendly letter, so the students could see the letter format they were to use (wish I had taken a picture of this for you).  Basically, they needed to write a 3 paragraph letter to a family member back home:  the first paragraph was to discuss their journey, the second paragraph explained what they discovered, and the third paragraph discussed their plans for the future.  Students were to use historically accurate facts that they had researched from their textbook, but also throw in some fictional details (which gave us a great opportunity to discuss the genre of historical fiction).  Lastly, they were to age the letter in some way to give it an authentic look.  It's funny how this last little requirement completely excites the students.  They couldn't wait to get home and burn some paper.  Every year I worry that this assignment will lead to household disaster, but as far as I know, I haven't been responsible for any real fires ... yet.


This was one of my favourite letters.  This student chose Henry Hudson, and wrote a 3 page letter!  He even hand-made an envelope for the letter (and the envelope had a wax seal!).

The letters look great displayed on the bulletin board just outside my door.  And the best part is I get this fabulous whiff of coffee or tea every time I walk into my class.


Happy Wednesday!!!


16

Fraction Cootie Catchers

20 February 2012
What do you do on a long weekend?  Well, if you're a teacher, you plan, plan, plan ...  (that being said, I did enjoy some fun family time, and got a bit of baking done, too).

I've been thinking ahead to my next math units.  I'm doing geometry next (and I CAN'T WAIT to use the Angry Bird nets I found).

But then, after geometry, comes ... fractions.  I spent some of my free time this weekend creating a new collection of cootie catchers to help my students review fractions.  There are seven different cootie catchers included:  reducing fractions, equivalent fractions, improper fractions, mixed numbers, converting to decimals, converting to percents, and comparing fractions.  My students have almost come to expect some kind of new cootie catcher each month, so I think they'll be happy with these.  I gave the cover page a new look, too.  You can take a peek at my new Fraction Cootie Catchers by clicking on the picture to the right.

And ... just because I LOVE three day weekends ... want a chance to get a copy for FREE?  Be one of the first 5 people to leave me a comment below with your email address, and I'll email you a copy.

Happy Monday!


26

Our Many Faces: Visual Arts Activity

Isn't this fantastic?!? I LOVE how it turned out. And I really love that some of my students who wouldn't consider themselves "natural artists" saw great success with this activity. The activity took a bit of time to complete, but the end result was so worth it. This is how we completed the activity:


  • I started by taking pictures of my students (close-ups of their faces).
  • At home that night I used a free program (www.paint.net) to convert the pictures to black and white drawings (I have photoshop elements, but this free program worked better). I printed the pictures on standard letter size paper.
  • The students took the black and white drawings and drew a 2cm x 2cm grid over the picture.
  • They then took a piece of construction paper (4 times the size) and made a 4cm x 4cm grid on the paper.
  • They then had to enlarge their original picture onto the larger construction paper. It is important to stress that they work square by square, row by row - it is NOT a free sketch.
  • Once the enlargements are complete (this took a few 1/2 hour classes), they must erase all the grid lines.
  • They then divided their pictures into 4 equal quadrants. Each quadrant is completed using different materials and techniques. The upper left quadrant is painted. The upper right is shaded with pencil. The lower left used stippling with a black sharpie marker, and the bottom right used crayons or pencil crayons.
  • Lastly, students were instructed to fill in the background for each quadrant using any design they wish.
  •  After the pictures were mounted on colorful construction paper, I laminated them and hung them in the hallway outside my class. You wouldn't believe the reaction I got from other staff and students at the school!


Sticking with the face art theme, my three-year old proudly presented me with this picture when I picked her up from daycare today. "I made this for you, mommy. This is YOU!"

Hmmmmmm ....... I see horns - do you see the horns? I must admit though, I did FEEL like this by the end of the day today.
IS IT FRIDAY YET???
3

Math Journal Sundays

19 February 2012

GOOD Sunday morning!  Kids are playing with their Barbies (not so quietly this time), I've got my coffee, and life is good.

I've got another full lesson to go along with our journal foldables from this week.  We're still in our measurement unit - studying area and perimeter - hoping to finish up next week.  Last week I shared a lesson we did that had the students working towards the realization that when given the same perimeter, rectangles closer to a square shape have the smallest area.  They also discovered the formula for the area of a triangle.

photo of area and perimeter of parallelograms @ Runde's Room

This week one of our hands-on lessons was about the relationship between parallelograms and rectangles.  I had them construct a rectangle with a perimeter of 90 cm (this was the same perimeter they were working with last week when they constructed rectangles - I did this so students who had difficulty the first time would have a chance to master it this time).

Once they had made their rectangles, they had to solve for the perimeter and area (using the formulas) on the front of the rectangle.


photo of area and perimeter of parallelograms @ Runde's Room

Now this was (apparently) the tricky part.  Without any direction or hints from me, I told them to decompose their rectangle to make a parallelogram. I did tell them they had to keep the area the same (meaning they couldn't have any scraps of paper left over).

Well, it took a while, but they finally got it.  They cut a small triangle off one side, and taped it to the other side.  Once all the students accomplished this (we went through A LOT of tape).  I had them solve for the perimeter on the back of their shape.  They were shocked to find the perimeter was different - so many of my students thought they had made a mistake and went back to measure again.  Which led us to the big idea ... diagonal lines are longer than straight lines.  When they went to solve for area, many of them wanted to use the diagonal as their width, and were confused again when their parallelogram didn't have the same area as their rectangle.  I reminded them about triangles, and how we use the height to find area ... and that was all I needed to say.  The students then found the area using the base and height.

photo of area and perimeter of parallelograms @ Runde's Room

Here are all our parallelograms posted at the end of the lesson.  The students all found it pretty amazing all these different sizes and shapes started with a rectangle with a perimeter of 90 cm.


We ended the class with a foldable to show the relationship between rectangles and parallelograms.  They started with a rectangle they folded in half.  On one of the halves, they turned the rectangle into a parallelogram, using the same method they had in the lessons.  They then measured and labeled the dimensions, and solved the perimeter and area of both.
photo of area and perimeter of parallelograms @ Runde's Room

photo of area and perimeter of parallelograms @ Runde's Room

photo of posting learning goals in the classroom @ Runde's Room
And, judging from the exit slips on our learning goals at the end of the day, I think they liked it and learned something ... or maybe it's just because math is our last class of the day ;)


Happy, Happy Sunday!!!  We're off on Monday for Family Day in Ontario!  YAY for long weekends!
12

We Heart Books - Part 2

16 February 2012
Do you remember the We Heart Books activity I shared with you earlier this week?  Here is a picture of the bulletin board we created just outside our classroom (we actually displayed our work across two bulletin boards - this is just one of them).

Do you remember that I promised you I would share the writing prompt sheet we used for it?  Well, I went one step further.  I created a whole FREEBIE file just for you!  This file contains instructions, a sample of the art activity, the writing prompt instruction sheet with link to the website for creating the hearts, and a student example.  And you don't have to wait until Valentine's Day next year to use this activity - the LOVE of reading is something you can celebrate at any time of the year.  Just click HERE or on the picture below to download your own copy.  I hope you enjoy!


Happy Thursday!!!


10

We Heart Books

14 February 2012
I started a few heart-themed activities with my students yesterday.  We're making a bulletin board display titled "We Heart Books".  I'll share pictures of the completed bulletin board tomorrow, as a nasty little stomach bug kept me from school today.  And before you feel sorry for me for missing Valetine's Day at school, I was quite okay with it -hormone crazy twelve year-olds on sugar highs isn't exactly my idea of fun.  ;)


Anyhow, we started off on Monday morning with some fun "heart art".  We talked about monochromatic colours and lines, and I showed them how a curve in the line can make an optical illusion.  It was an easy and inexpensive art activity - all they needed was a ruler and a few markers or pencil crayons.


I also had the students create "heart art" in language.  I had the students write about their favourite books they had read this year.  I gave them a list of prompts (I'll upload the assignment sheet when I post pics of the bulletin board - it's at school, too), and had them write their answer on a site I found through Pinterest - Festisite.  This site created cute little hearts from their writing - which look great posted beside the line heart art.


And, because it's Valentine's Day, I thought I'd share a little bit about my Valentine.  I'm linking up to Buzzing with Ms. B for her "How I Met My Hunny" linky party.

I met my husband when I was in grade 12 and he was in grade 13 (yes, we used to have 5 years of high school in Ontario).  Although we went to the same high school, I somehow didn't meet him until we were both on a bus going to a ski trip in Quebec.  It was VERY late at night (or VERY early in the morning) when we were first introduced, so I don't think we exchanged many words beside "hi" (although I do remember I thought he had beautiful eyes).  To sum up our 20 year history in a short little paragraph, we were together by the end of the trip, and have been together ever since.  We ended up going to the same university, moved back home together, found jobs, got married, and had three beautiful little girls.  It may not be the most exciting of stories, but it's our story ... and I think it's perfect.  :)
This was us just after we graduated high school ... almost 20 years ago ... 


Here we are at our wedding ... ten years ago ...


And here's one from this year.  Love you, sweetie.  Happy Valentine's Day!

Happy Tuesday!  And Happy Valentine's Day!
8

Math Journal Sundays

12 February 2012
There's just something about Sunday mornings - sitting on the couch with my laptop and coffee, kids quietly playing (for now) - that makes me think I can accomplish anything today ... (which is a good thing because I'm going to need that positive attitude later when I attempt to do some cleaning around here, and make a big yummy lasagna for supper, and fold what will feel like one million cootie catchers for Valentine's Day).

Anyhow, before I tackle the mess I call home, I've got a fun math activity to share for math journal Sundays.  Actually, my post will cover the whole math lesson, but the lesson ended in a fun little foldable.  

photo of comparing perimeter and area of a rectangle @ Runde's Room
We've been studying the relationship between perimeter and area, and I thought it was time to go a little more hands on.  I handed out medium-sized sheets of construction paper, and we got started.

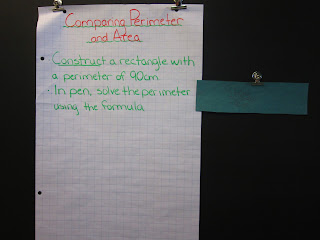
I asked each student to construct (we talked about using a ruler and a protractor to be precise) a rectangle with a perimeter of 90 cm.  When all students had done this, I posted one of them on the blackboard.  


photo of comparing perimeter and area of a rectangle @ Runde's Room

I didn't tell them what dimensions to use because I wanted to have a variety of shapes.

They then had to use the formula to solve the perimeter (on the front of the rectangle), and area (on the back of the rectangle).


photo of comparing perimeter and area of a rectangle @ Runde's Room

I then went around the room, and we discussed the different areas of the rectangles.  We then posted them on the board (smaller areas on the one side, and larger areas on the other side).  And voila!  The students had a strong visual reference as to what shapes of rectangles have the smallest and largest areas, as all rectangles had the same perimeter.


photo of comparing perimeter and area of a rectangle @ Runde's Room

The students came up with the "big idea", which we wrote on the bottom of the chart paper - "When the rectangles have the same perimeter, the closer the shape is to a square, the greater the area".


But that's not all.  I wanted to move on to the area of a triangle, so I had the students get their rectangles off the blackboard, and draw a diagonal on them.  They then cut down the diagonal to make two triangles the same size.  When I asked them what the area of their triangle was, they knew immediately that the area was half of what the rectangle was.  Using one of the triangles, they then solved the area, using the formula.  I had so many students tell me how easy this was, I had to pass around my Easy button for them all to press.  (LOVE it)


We finished off the lesson with a great little foldable for our math journals.  I had them cut out a square, and fold it in half into a triangle.  They glued this into their journals, and solved for the area of the triangle and the rectangle (square).  
photo of area of triangles math journal entry @ Runde's Room


photo of area of triangles math journal entry @ Runde's Room

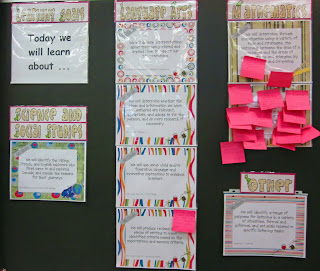
photo of posting learning goals in the classroom @ Runde's Room
You know those rare occasions when you just KNOW the lesson went absolutely perfectly - well, this was one of those times.  I was so happy with the final results, and I KNOW all my students were engaged and learning. Just look at the distribution of sticky note exit slips on our learning goals at the end of the day ... I think they liked the lesson.  ;)


Happy, Happy Sunday!!!


15