RUNDE'S ROOM: assessment

Showing posts with label assessment. Show all posts

Quick Writing Reflection

01 August 2019
Runde's Room:  The Line I'm Most Proud of in my Writing Today ... Quick Writing Reflection
This super easy "Don't Stop Until You're Proud" chart may be the best thing that happens to your writing program.  Seriously.  Student self-reflection, goal-setting, peer feedback, writing collaborating, teacher evidence, portfolio piece ... all in a 5 - 10 minute activity.  And the very best one - student pride. 

I'm lucky in that most of my students love writing every year.  They really do.  A definite credit to my fantastic coworkers who built this into our students.  We do a lot of formal writing all the time, but we also make the time to do a lot of "free writing" in my class.  Any writing style.  Any genre.  Any topic.  Just write.  10 - 15 minutes.  But ... be prepared to share your writing with a friend at the end of the time.  (You can read more about this time in my blog post - Just Let Them Write).

Runde's Room:  The Line I'm Most Proud of in my Writing Today ... Quick Writing Reflection
About every 2 - 3 weeks, I quickly title a piece of chart, "Don't Stop Until You're Proud - The Line I'm Most Proud of Today is ..." and hand out sticky notes.  The chart isn't instagram pretty, but it's easy and crazy effective.  Which makes it way better than instagram pretty in my books.  I usually have this set up before they begin writing, so they're working just a little harder while they're crafting their pieces ... knowing they will share their best at the end. 

This chart works for any kind of writing - after formal writing lessons, or after fun free writing time.  I try to do a combination of both.  Sometimes I relate the writing to a particular goal we're working on from our writing units which focus on the traits of writing, or from our independent writing goal clip chart, or I ask them to include a kind of punctuation and circle it (comma, apostrophe, etc.), and sometimes there are no rules at all.

When our writing time is up, I ask the students to read through their work, focusing on their very, very best line or sentence from their work - the sentence they are most proud of (I really play this part up).  They then buddy up to read each other what they have.  Working together, they need to make at least two improvements to their line (improve a word, fix spelling, add a phrase, etc.).  When this is done, they write their sentences on a sticky note and add them to the chart paper.  That's it.  My students are always anxious to read what others have written - and their compliments to each other are so genuine.  I love it.

Runde's Room:  The Line I'm Most Proud of in my Writing Today ... Quick Writing Reflection
So ... chart done - now what?  You could leave the activity at that - writing revision, self-reflection, peer feedback, peer collaboration ... 10 minutes ... check.  Or you could use the stickies for:

  • students add them to a portfolio page where they can track the growth in their writing over a term or year
  • teacher can add them to assessment binders for writing evidence - especially at the end of units or near the end of the term
  • use them in student teacher conferences to set new writing goals or provide quick oral feedback
  • use them as exemplars of great writing and share (can be anonymous) with the class
  • use them as story starters for a quick writing activity - read the student's sentence and have the class write the next sentence (or finish the paragraph) (my classes LOVE this one)
And this chart doesn't have to be for writing - I'm going to try, "The proudest math moment I had today was ..." next year.  :)  


Writing resources in this blog post:


0

My Favorite No

24 March 2016
My Favorite No is my favorite YES in my math class.  I seriously LOVE this.  I fell in love with this idea when I first saw it just over two years ago (you can read a previous blog post HERE).  I started in the classroom then, and it has stayed a favorite.

The first 10-15 minutes of my math block is always reserved for some sort of review or spiral activity.  This year, from September to December we dove into Number Talks, from January to March Break we did Math Meetings (4th Grade Frolics has a great post about it HERE), and from now until the end of the year we'll be switching between Math Meetings on Tuesdays and Thursdays, and My Favorite No on Mondays, Wednesdays, and Fridays.  Perfection.

If My Favorite No is new to you, you have to start out by watching THIS VIDEO (then come right back here so I can share more with you).  ;)

My Favorite No is the perfect companion to all the Growth Mindset teaching I've been doing in the classroom this year - teaching that the best learning opportunities come from making mistakes.  This is EXACTLY the message I want my students to take away from all of this.

My Favorite No for Problem-Solving in Math

OK ... so here's how it goes.  I pose a problem.  In the past I've done more skill (knowledge) based questions, but this year I'm focusing on word problems because my data is showing my students need this.  I write the problem on a small cue card and project it for the students to see.

My Favorite No for Problem-Solving in Math
We then go through and mark the question together using CUBES.  (You can read more about CUBES in a blog post I have HERE).

Then, my students get 5 minutes to independently solve the problem (I set a timer and everything because they love the timer).  They are also writing on the small cue cards (I'll post a link to the cue cards I bought at the bottom of the page. I buy them in bulk, but any method you choose will work fine).

When they are finished, before they hand their cards in, they have to do a traffic light comprehension dot in the corner (green for no problems, yellow for a little difficulty, and red for a lot of difficulty).  I have a poster hanging in my class explaining the Traffic Light Comprehension Dots (I had it made at Vistaprint) - but you can grab a free copy of the pdf I made HERE.  We use traffic light comprehension dots on everything!
My Favorite No for Problem-Solving in Math

My Favorite No for Problem-Solving in MathThe students also color code their answers according to our Math Response Learning Goals.  These learning goals are EVERYTHING in my classroom.  They are seriously one of my most favorite resources.  They are from my Building Better Math Responses resource and they have truly made our responses better.  You can take a peek at them HERE.
Students don't write their names on the front of the card before they hand it in, instead, I just have them initial the back - that way, if their card is chosen as "My Favorite No" it still has a little anonymity to it.  When they hand the cards in, I quickly sort them into 3 piles - 1) correct, 2) correct strategy but a small error somewhere, and 3) incorrect.  

My Favorite No for Problem-Solving in MathI then sort through the "correct strategy but a small error somewhere" pile and choose "My Favorite No".  This particular card will have a lot of wonderful thinking shown, but contains a small error or misconception somewhere that probably more than a few students in the class are making.  I put this card up under the projector for all to see (remember, it's anonymous) and talk about all the wonderful things I love about the answer given.  I then give students one to two minutes to do some error analysis with their partner or elbow buddy.  After this time, together we fix up the problem and (hopefully) clear up any misconceptions.
My Favorite No for Problem-Solving in Math

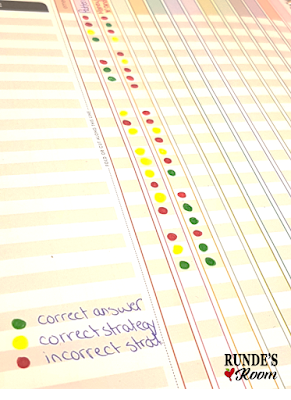
My Favorite No for Problem-Solving in MathSo ... what do I do with the cards when we're done?  Well, remember the three piles I sort the cards into?  I record this data into my grade book with easy colored dots - green for correct, yellow for correct strategy but small error, and red for incorrect.  I write the math concept for the word problem at the top of the page so I can go back and see where we need to do a little extra review.  These circles will also make it very easy to see which students need a little extra help with some small group sessions during math stations.  We've done two of these activities this week, so this is what my grade book looks like so far.  (See all those yellows and reds ... we've got some work to do during this last term ... but we're up for it).
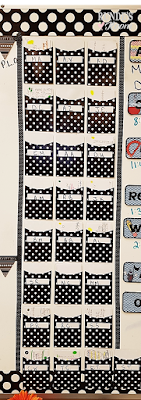
My Favorite No for Problem-Solving in MathI put a little sticker in the corner of the correct cards, and then I file all the cards in little library card pockets for each student.  When the pockets get too full, we simply clip the cards together and file them in our portfolios, and start filling them again.  The students crowd around me as I'm putting the cards in the pockets to see if they got a sticker on their work - it's kind of fun.  :) 
Now, if you're thinking this will embarrass the students, it won't.  I promise.  In all the time I've done this in my class, I've never ever ever had a student upset by it.  There is a solid rule in my room that we don't say whose card is My Favorite No, and their names aren't on the cards.  But ... even so, often the student who was chosen is really excited they had the chosen card, and will want people to know (even though I still don't let them say anything in the classroom).  When you teach your students how important mistakes are to the learning process, they are not embarrassed by their mistakes, they look forward to growing from them.  And that, my friends, is a beautiful thing.


(affiliate link)
4

Adding Student Evidence to Learning Goals

12 January 2016
I've been using my Building Better Responses Goals and Resources for a few years now, and they are one of my absolute favorite resources to use in the classroom because they just work for my students.  And they prepare the students for testing better than anything else I have used.  But, something new I've been doing this year is adding a student evidence piece alongside the goal - proving the mastery of the goal.  I am loving how this small change has excited my students and motivated them to work even harder.  It's an awesome thing to see.

If you are new to my Building Better Responses resources, you can read a little more about them in blog posts I have HERE and HERE.  Basically, it's our system of scaffolding the learning goals needed to compose a well thought out response - to reading, writing, or math questions (I have resources for all 3).  Students use colors to code their work - showing exactly where they have included each learning goal in their answer - actively monitoring their thinking and analyzing and reflecting on their strengths and areas of need.

There are many ways to use the better response goals, but in my class, I teach them whole group - starting with the first goal and slowly adding to them - usually adding a new goal about every two or three weeks - this really allows for mastery at each step.  And each time my students show mastery of a goal, I add an evidence piece to the space on the board beside the goals.

 I post both my reading and math response goals on a small section of whiteboard, separated with some washi tape. (I finally found a use for washi tape!)  Each time we add a new goal, I model what a response should look like, and we talk about how we would color code the evidence in our answer.  The evidence piece always comes from student work - it is not a copy of an answer I've modelled - that doesn't show mastery of anything except the ability to copy from the board.  ;)

The first time I chose evidence pieces from the students - ones where they had really shown mastery of the goal, the students were very surprised ... and a little proud, too.


So, we kept it going.  We've recently added our fourth reading response goal and third math response goal, and I can't believe how well the evidence piece is working for my students' motivation.  Each time we do a response, my students work SO HARD to have their work chosen as the evidence piece, and they are so excited to share their work with me (and sometimes I add more than one evidence piece simply because it was too hard to choose ... and so more students have the opportunity to have their work shared - and all students will make it onto this board at some point through the year).  Most of the time their responses are written with resources from the Building Better Responses resource or my Stick-It-Together resources (the better responses and stick-it-together pair very well together), but really, any form of response would work well.


I am so proud of the work they've been doing - and I know when they see their work showcased like this, they're proud of themselves, too.


6

Getting Students to Reflect on Their Writing

27 October 2015
REFLECT is probably one of the words I say the most each day in our classroom.  We're always going back and reflecting on our learning, and taking our reflections to make improvements in our work.  I've used quite a few different ways to do reflections in my classroom, but this year our focus is Traffic Light Reflections (you can click on the link to read a little more about these kinds of reflections).  We already use traffic light dots to reflect on our comprehension of our learning goals, so using full traffic light reflections seemed a natural fit.

We've been focusing a lot on writing reflections lately.  As we're moving towards student-led parent conferences in my classroom this year, I wanted to make sure all the students had a great base piece for their portfolios - reflecting on their writing and improvements at each stage so they can clearly communicate where their starting points were, as well as what goals they are working towards mastering.

My go-to writing resource at the beginning of the year is Paragraph of the Week from Teaching in Room 6 (you can read more about this resource on her blog by clicking HERE).  The clear and easy-to-follow step-by-step scaffolded paragraph writing practice is the perfect starting point for my students.  

When we have finished our rough drafts of the paragraph, we then use my Revising and Editing Resource to go through our writing pieces one step at a time.  Through this process, students color code their writing as they look for each expectation - from structure to mechanics.  As they code, they write a short reflection on a sticky note.  At the end of this activity, they take their sticky notes and fill in a full reflection sheet where they discuss their strengths and needs, and make plans for revision for their final good copies.  This reflection sheet is also included in the Revising and Editing Resource.


Students then use these reflections when writing and publishing their good copies.  At the end of the publishing process, students complete a final Traffic Light Reflection before they hand in their good copies.  I added a small copy of the rubric included in Paragraph of the Week to the reflection sheet so I could provide feedback right on their reflection sheet.  I love these quick reflections - quick and easy for the students, and the fact that they have to go back to their published copies and provide evidence for their reflection by color coding their work really helps them keep their reflections and goals specific and achievable.  And I really really love that I get to read little gems like this one below while I'm marking.  :)  Her "green" reflection - what she's most proud of - just makes me smile.


At the end of the traffic light reflection, each student had to set a personal writing goal.  They were given a clothespin to mark the goal on the Writing Goals Clip Chart in our classroom.  This chart is a daily visual reminder of their goals and has been so helpful in the classroom.  The students take control of their learning - coming to me when they believe they have mastered a goal (with writing pieces as proof), and get so excited to be able to clip their pin onto a new goal.  (Each clothespin has the name of a student written on it - you can't see it in the picture because I blurred out the names).

All these sheets - their rough copies, reflection sheets, good copies, and traffic light reflection get stapled together and kept in their portfolios after I conference quickly to provide feedback with each student.  Before they begin their next writing piece, they get these sheets out of their portfolios so they can see where they want to try to make improvements in their next piece.  Watching them go back through their reflections, seeing them think about their writing, and helping them actively make improvements to their writing is such a rewarding process for all of us.  They also do quick pair-shares with their "elbow buddies" to show and prove where they made their improvements during the writing process for each piece.

If all of this process seems daunting - don't get overwhelmed - it's actually pretty simple.  We break down this process quite a bit.  Students spend about 4 days writing their pieces (from the paragraph of the week to longer pieces like the Halloween narratives we're working on now), then one to two days on the revision and editing process, including first reflection (depending on the length of the writing piece), another day or two on their good drafts (including publishing them), and then one more day on their traffic light reflections before handing in.  Each day I provide them with about 20 - 30 minutes of writing time (on publishing days we may take a little longer).  Each full writing piece from start to finish takes about two weeks of these writing blocks - and results in a wonderfully polished and substantially improved piece of work.  When they focus on their reflections at each stage and use these reflections to improve the next piece they write, they are always amazed at how much their writing improves from piece to piece (and so am I).

EDIT:  I have received many requests to share a copy of the reflection sheet I have - so I made a new one to share with you.  If you would like a copy, just click HERE or on the picture to the right.  I uploaded it to google drive - you just need to click the down arrow to download a copy.  :)  


3

Traffic Light Reflections

30 September 2015
I'm trying something new with student reflections this year - traffic light reflections.  In the past, I've done Glow and Grow reflections (you can read a little more about that strategy HERE), and I still love love love those reflections, but with my students already familiar with our Traffic Light Comprehension Dots  I decided to keep things simple for them, and changed up our reflections a bit.

(That and I found the coolest light up traffic light at Hobby Lobby and made it a fixture in our class - it's the little things that make me happy).  ;)


I'm planning on doing student-led conferences near the end of the year this year, so I wanted to make sure their portfolio pieces contained a lot of reflections they could refer back to - not only for the conferences at the end of the year, but also to drive their everyday goals.

This week we've used the traffic light reflections with our first writing piece - I just kept it very simple and made a quick template with three dots to resemble the traffic light.  They colored the dots red, yellow, and green - and then had to write down something from their writing for each level of dot:

  • red shows an area where they know they need to improve
  • yellow shows an area where they are working on and improving in ... but can continue to work on
  • green shows their strengths - something they are really proud of
They also used the red, yellow, and green to mark their own writing and show where the areas were in their writing.  When finished, the reflection sheet was stapled to the back of their writing, and placed in their portfolios.


We also used the traffic light reflection on our summary of learning at the end of our math unit this week.  As part of our review before our summative, I do a "summary of learning" where they come up with and reflect on all our learning goals from the unit (this time using "I Can" instead of "I Will" because it's the end of the unit).  I did a class anchor chart, and students copied this into their own notes.  I then asked them to individually reflect on those goals - putting a traffic light dot beside each goal, depending on their level of comfort with the goal.  I reminded them to let this help drive their studying and review for the test - spending more time on concepts they felt were a yellow or red.

We also reflected as a whole group - asking everyone how they felt about a specific goal, and taking a vote for the traffic light reflection dot for each goal.  This was done on our anchor chart.  This gives me a great insight into which areas to do a little more review on before the summative, and I can see who to quickly pull for a little small group practice.  I usually get asked, "Do students really want to admit they don't understand and put down a red dot on their paper, or raise their hand for a red dot?"  And my answer is YES.  I've done traffic light comprehension dots (and now reflection dots) for 4 years now, and my students have always been willing to admit where they need a little extra help without any apprehension or embarrassment at all.  And I am so thankful for that.  And so are they - knowing it's one way of letting me know they need a little extra something from me.

Happy Wednesday!


6

Scaffolding the Learning

26 July 2015


It's getting pretty close to back to school time again (and it's already that time for some of you).  Don't panic.  I've gotten together with some of my best upper grade blogging friends to create a back to school survival guide full of our best tips and tricks for you.  So ... relax and breathe.  And then breathe again.  We're all in this together.

If you are a brand new teacher, or are starting a new grade level this year (like I am), one of the first things you do is start to scour the curriculum to see the expectations and standards you need to cover.  And usually the second thing you do is start to panic, wondering how you are going to fit it all in and tie it all together in a neat little package so that your students are demonstrating their learning in those perfect little constructed responses that are required. The most important thing to remember is that these standards and expectations and constructed responses are something that students should know by the END of the year (or by testing time, which is often sooner ... but that's a post for another day).  You (and your students) have TIME to get there.


Scaffold the Learning:
Although you do need to start out right away teaching the expectations and standards, you don't need to expect full constructed responses from your students right away.  Let them start slow - their brains are hard at work learning the new concepts - give them a chance to master the material first.

When I do start them on constructed responses, I start out with one simple step.  I introduce our first response learning goal by the second week of school - and I keep it easy by starting with "start with part of the question in your answer" in reading and "plan your organization" in math.  We talk about why each learning goal is an important part of the constructed response, and we color code these parts when practicing our responses.

I scaffold the learning by introducing one step at a time, and give them time to master it before adding a second step.  This way the students aren't struggling to remember all the steps to constructed responses as well as the lesson standards and expectations for the concepts taught.  I keep a bulletin board of these learning goals (our response learning goals) and we slowly add to them each time I introduce a new goal (adding a new goal about every two weeks or so).  By January, we have a complete set of learning goals for our constructed responses, giving the students the rest of the year to practice combining the concepts they've learned with their constructed responses learning goals.  And by keeping the learning goals posted (written in the color they should use to color code their responses) they have a reference they can use independently to improve their responses.  By having them color code their responses, I find it increases student accountability and accuracy incredibly - they know what is missing from their responses and have time to add to their answers before handing something in for assessment.

Our first learning goal for responses in reading is "start with the question".  It gets posted on our bulletin board.  As we continue to add learning goals over the coming weeks, I place each one on the bulletin board below the one before it.
Our first learning goal for constructed responses in math is to "plan your organization".  This starting point helps them think about how to show their solutions in a neat and organized way that makes it easy to read (and assess).  Again, like in the reading, we continue to add learning goals to this bulletin board.


By January, our boards are a lot fuller and look more like this ...


The wonderful thing about scaffolding the learning is that you can work at the pace your students need - they will not get left behind.  Because you have time, you can spend longer on a certain area that your students have not mastered yet.  And because everyone continues to work on the same goal, there can be a lot of peer collaboration and helping in the classroom.  I like to do a lot of "turn and talks" where the students discuss with a neighbor how they will include the new learning goal in their answer and show each other what they have written.

You can read a little more about the strategies I use and see some of our work along the way in other blog posts I have written about this step-by-step process to building better responses.  Click HERE to see our scaffolded reading goals in action, and HERE to see our scaffolded math goals in action.  Each blog post also contains links to other blog posts I have written about this process.

You can create your learning goals based on the needs in your classroom, or if you're interested, I have made ready-to-use resources for scaffolding the learning that contain all the learning goals, posters, book marks, reflection sheets, scaffolded handouts, assessment ideas and activities for the students.  These are some of my most favorite resources I've created and they are invaluable in my classroom.  Click on any of the resources below or on the picture to the right to see a preview of my Building Better Responses resources.


Be sure to visit the blogs below to read their best Survival Tips, as well.  Have a GREAT start of the year!!!


2